nymgo sip trunk with Elastix or Asterisk
After a long trial and testing I manage to use sip trunk with nymgo on my Elastix PBX at my home.

nymgo sip trunk with Elastix or Asterisk
After a long trial and testing I manage to use sip trunk with nymgo on my Elastix PBX at my home.
TT
Tên chương trình .......
1
Phần mềm chấm công tiếng Việt Wise Eye 2010V1-TP(6.5MB)
2
Phần mếm chấm công tiếng Việt TAS2010
3
Phần mềm chấm công tiếng Việt TAS2008
4
HDSD Phần mềm chấm công tiếng Việt TAS2010
5
HDSD Phần mềm chấm công tiếng Việt Wise Eye 2010
6
HDSD Phần mềm chấm công tiếng Việt TAS 2008
7
NET Framework version 2.0 ( hỗ trợ Wise Eye 2010)
8
Phần mềm quét Virus Avira- antivir
9
Phần mềm gõ Tiếng Việt Unikey 4.0
10
HDSD MCC Thẻ Giấy UMEI Ne-5000, Ne-600...
11
Phần mêm TeamViewer - Hỗ chợ từ xa
12
HDSD Máy Chấm Công Thẻ Giấy Seiko QR350
13
Foxit Reader Portable - Đọc file PDF
14
Phần mềm chấm công tiếng Việt TAS2008 (NU2100)
15
Phần mềm chấm công tiếng Việt Wise Eye 2010 V1
16
FixAuto
17
HDSD Máy kiểm Soát SOYAL ( Auto Door, thang máy , Auto door...)
18
Hmonitor 4.5.1.3 (Sep 08, 2010)
19
VNFix1.1
20
HDSD Phần mềm chấm công Time and Attendance 2008( Tiếng Việt)
21
Phần mềm TearmView QS
22
Win7 Ultimate
23
Font Vni Full
24
Potable Everest Ultimate Edition 5.01
25
Advanced IP Scand
26
Phần mềm chấm công ATT 2008 ( tiếng việt)
27
Phần mềm chấm công tiếng Việt MITACO 2010 (Ver 10.0 )
28
Setup Đâu đọc Symbol Ls 2208
29
Bộ cài máy in HĐ TM200
30
Hướng dẫn sử dụng phần mềm bartender
31
1 click co menu Hiren boot
32
1 click có Menu boot ini
33
Yahoo 10 setup
34
Mozila Firefox 4
35
Chat 2 Nick Yahoo
36
Tăng tốc máy tính
37
Kiểm tra chính tả trong word Office
38
IDM 6 full crack ( reg file)
39
Teamviewer 6
40
MicrosoftOffice2003 - Rut gọn
Hy everyone,
I thought to make a Tutorial about how to install Windows XP and run it on Android.
------------------------------------------------------------------------
Requirment
At first you have to download Bochs for Android and PC
Android version: http://forum.xda-developers.com/show....php?t=1389700
Thanks to korvs2003
PC Version: http://bochs.sourceforge.net/getcurrent.html
Then Download Qemu: http://wiki.qemu.org/Download
You need Windows XP
Android: Install Bochs
PC: Install Bochs and Qemu
--------------------------------------------------------
Creating the bootable image!
1. Open up Bochs for PC and run bximage.exe -> you can find bximage here C:/Program Files/bochs/ | depends on where you have installed it.
2. Create a Image with following: hd, flat, 1500, c.img
hd: It is the format of your boot disk. | fd will create a bootable floppy disk image. For some odd reasons you can use with win 3.11 or something like that.
flat: It means that it has a fixed size.
1500: It is the size of your Image. | you need around 1,5 gb disk space, because the installation of winxp, even you edit it with nlite, wont let you use lower disks -.- , i am trying to solve that problem.
c.img: It is the name of your Image. | choose the name like you want to, but dont forget to edit the bochsrc.txt, else it wont start.
notice: Maybe you have to run bximage.exe as Admin.
--------------------------------------------------------
Install Windows XP in the boot image
1. Open up Qemu
2. Set up a new Virtual Machine
3. As disk use the c.img
4. Configure the cdrom
5. Give the machine around 512 MB - 1 GB RAM if possible
6. start the Virtual machine and run the installation of Windows XP
---------------------------------------------------------
Run the Image on Android
1. create a SDL folder on your SDCARD like here http://forum.xda-developers.com/show....php?t=1389700
2. copy your c.img to your SDCARD: sdcard/SDL/c.img
3. now replace the bochsrc.txt lines with:
Code:
megs: 256 cpu: count=1, ips=6000000, reset_on_triple_fault=1, ignore_bad_msrs=1 # filename of ROM images romimage: file=BIOS-bochs-latest vgaromimage: file=VGABIOS-lgpl-latest vga: extension=cirrus, update_freq=25 pci: enabled=1, chipset=i440fx, slot1=cirrus ata0: enabled=1, ioaddr1=0x1f0, ioaddr2=0x3f0, irq=14 ata1: enabled=1, ioaddr1=0x170, ioaddr2=0x370, irq=15 ata0-master: type=disk, path="c.img" #ata0-slave: type=disk, path="d.img" #ata1-master: type=disk, mode=vvfat, path=/sdcard/HDD, journal=vvfat.redolog #type=cdrom, path="CD.ISO", status=inserted boot: c config_interface: textconfig #display_library: x # other choices: win32 sdl wx carbon amigaos beos macintosh nogui rfb term svga log: bochsout.txt sb16: enabled=1 mouse: enabled=1 sb16: wavemode=1, dmatimer=500000 clock: sync=none, time0=1
For more Information about bochsrc configuration visit http://bochs.sourceforge.net/doc/doc...r/bochsrc.html
megs: ram in MB you will give the machine.
I use 256 (Xperia Play) 300mb will crash your windows after a while.
4. Run bochs on Android.
Boot will take around 30 min, yeah it is really slow
---------------------------------------------------------
Notice
I used Nlite to resize and optimize windows xp before installing it.
here some screenshots:
http://imageshack.us/photo/my-images...7566148311.png
http://imageshack.us/photo/my-images...7565583563.png
http://imageshack.us/photo/my-images...7569555412.png
http://imageshack.us/photo/my-images...7569773009.png
http://imageshack.us/photo/my-images...7569992581.png
xda-developers.com
Here below some drafts notes on how to boot WINPE on a UEFI computers.
1/Files you need from your windows x64 dvd
-\efi\boot\bootx64.efi file (1)
-\efi\boot\bcd file (2)
-\efi\boot\boot.sdi file (3)
-\efi\microsoft\boot\fonts folder (4)
-\sources\boot.wim (5)
If you dont find bootx64.efi, you can use bootmgfw.efi which is in install.wim on your dvd (sources folder).
Use 7zip to extract this file from the wim file and rename it to bootx64.efi
2/Files you need in your tftp root
-get in your tftp root
put bootx64.efi (from 1)
-create a SOURCES folder
put boot.wim in there (from 5)
-create a BOOT folder
put boot.sdi in there (from 3)
put bcd in there (from 2) / applies for Win8
-create a EFI/MICROSOFT/BOOT folder
put bcd in there (from 2) / applies for Win7
put the FONT folder in there (from 4)
You should end up with the following :
=>ROOT
-bootx64.efi
==>SOURCES
==boot.wim
==>BOOT
==boot.sdi
==bcd (for win8)
==>EFI/MICROSOFT/BOOT
==bcd (for win7)
===>FONTS
===*.ttf
3/Things you need to do on your boot.wim
Add the following winpeshl.ini (create it with notepad) file in your boot.wim (system32), making it a « cheap » winpe.
To modify your boot.wim, you can either mount/change/commit it with DISM (from the command line), or withCloneDisk or else modify it with wimlib :wimlib-imagex update boot.wim 1 --command="add CustomWinpeshl.ini \Windows\System32\winpeshl.ini"
[LaunchApps]
%SYSTEMDRIVE%\Windows\system32\startnet.cmd
%SYSTEMDRIVE%\windows\system32\cmd.exe
4/Things you need to do in your PXE Server :
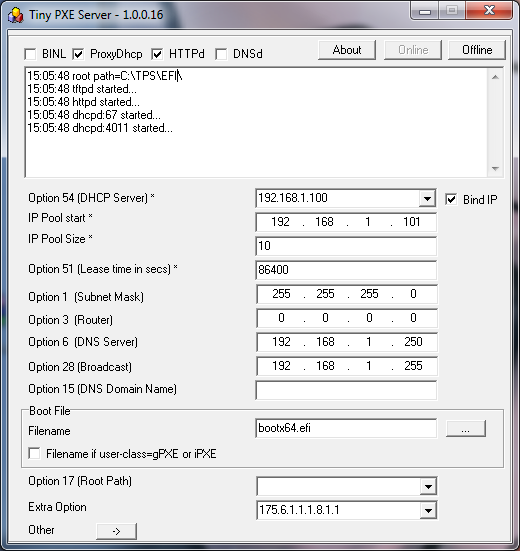
Set bootx64.efi as the bootp filename.
The UEFI + PXE boot process will be the following :
-pxe->bootx64.efi (from windows install dvd)->bcd (pointing to winload.efi)->boot.wim (x64 only)
as opposed to a legacy bios computer :
-pxe->pxeboot.n12 (from windows install dvd)-> bootmgr.exe -> bcd (pointing to winload.exe) -> boot.wim
Site note : you can use option dhcp 252 to decide which BCD file to load.
Can be handy when you want to switch from a UEFI computer to a legacy BIOS computer : efi\microsoft\boot or boot\bcd
side note : you can check if you booted on uefi with the following reg query HKLM\System\CurrentControlSet\Control /v PEFirmwareType Will output 0x1 for bios, 0x2 for uefi.
Cheers,
Erwan
Note that the following would aso work : PXE-> IPXE.efi ->MS Bootx64.efi ->BCD (winload.efi) ->Boot.wim (x64).
Ipxe script
#!ipxe
#change with you dhcp or proxydhcp server
set next-server 192.168.1.11
set filename boot/x64/bootmgfw.efi
chain tftp://${next-server}/${filename}
And changes to apply to your BCD : bcdedit.exe /store my.bcd /set {bootmgr} nointegritychecks yes


