10/10/14

on Leave a Comment

Windows XP for Bochs

Hy everyone,
I thought to make a Tutorial about how to install Windows XP and run it on Android.
------------------------------------------------------------------------
Requirment
At first you have to download Bochs for Android and PC
Android version: http://forum.xda-developers.com/show....php?t=1389700
Thanks to korvs2003
PC Version: http://bochs.sourceforge.net/getcurrent.html
Then Download Qemu: http://wiki.qemu.org/Download
You need Windows XP
Android: Install Bochs
PC: Install Bochs and Qemu
--------------------------------------------------------
Creating the bootable image!
1. Open up Bochs for PC and run bximage.exe -> you can find bximage here C:/Program Files/bochs/ | depends on where you have installed it.
2. Create a Image with following: hd, flat, 1500, c.img
hd: It is the format of your boot disk. | fd will create a bootable floppy disk image. For some odd reasons you can use with win 3.11 or something like that.
flat: It means that it has a fixed size.
1500: It is the size of your Image. | you need around 1,5 gb disk space, because the installation of winxp, even you edit it with nlite, wont let you use lower disks -.- , i am trying to solve that problem.
c.img: It is the name of your Image. | choose the name like you want to, but dont forget to edit the bochsrc.txt, else it wont start.
notice: Maybe you have to run bximage.exe as Admin.
--------------------------------------------------------
Install Windows XP in the boot image
1. Open up Qemu
2. Set up a new Virtual Machine
3. As disk use the c.img
4. Configure the cdrom
5. Give the machine around 512 MB - 1 GB RAM if possible
6. start the Virtual machine and run the installation of Windows XP
---------------------------------------------------------
Run the Image on Android
1. create a SDL folder on your SDCARD like here http://forum.xda-developers.com/show....php?t=1389700
2. copy your c.img to your SDCARD: sdcard/SDL/c.img
3. now replace the bochsrc.txt lines with:

Code:

megs: 256 cpu: count=1, ips=6000000, reset_on_triple_fault=1, ignore_bad_msrs=1 # filename of ROM images romimage: file=BIOS-bochs-latest vgaromimage: file=VGABIOS-lgpl-latest vga: extension=cirrus, update_freq=25 pci: enabled=1, chipset=i440fx, slot1=cirrus ata0: enabled=1, ioaddr1=0x1f0, ioaddr2=0x3f0, irq=14 ata1: enabled=1, ioaddr1=0x170, ioaddr2=0x370, irq=15 ata0-master: type=disk, path="c.img" #ata0-slave: type=disk, path="d.img" #ata1-master: type=disk, mode=vvfat, path=/sdcard/HDD, journal=vvfat.redolog #type=cdrom, path="CD.ISO", status=inserted boot: c config_interface: textconfig #display_library: x # other choices: win32 sdl wx carbon amigaos beos macintosh nogui rfb term svga log: bochsout.txt sb16: enabled=1 mouse: enabled=1 sb16: wavemode=1, dmatimer=500000 clock: sync=none, time0=1

For more Information about bochsrc configuration visit http://bochs.sourceforge.net/doc/doc...r/bochsrc.html
megs: ram in MB you will give the machine.
I use 256 (Xperia Play) 300mb will crash your windows after a while.
4. Run bochs on Android.
Boot will take around 30 min, yeah it is really slow
---------------------------------------------------------
Notice
I used Nlite to resize and optimize windows xp before installing it.
here some screenshots:
http://imageshack.us/photo/my-images...7566148311.png
http://imageshack.us/photo/my-images...7565583563.png
http://imageshack.us/photo/my-images...7569555412.png
http://imageshack.us/photo/my-images...7569773009.png
http://imageshack.us/photo/my-images...7569992581.png


xda-developers.com
9/10/14

on Leave a Comment

Boot WINPE over PXE on a UEFI computer

Here below some drafts notes on how to boot WINPE on a UEFI computers.

1/Files you need from your windows x64 dvd

-\efi\boot\bootx64.efi file (1)
-\efi\boot\bcd file (2)
-\efi\boot\boot.sdi file (3)
-\efi\microsoft\boot\fonts folder (4)
-\sources\boot.wim (5)

If you dont find bootx64.efi, you can use bootmgfw.efi which is in install.wim on your dvd (sources folder).
Use 7zip to extract this file from the wim file and rename it to bootx64.efi


2/Files you need in your tftp root

-get in your tftp root
put bootx64.efi (from 1)
-create a SOURCES folder
put boot.wim in there (from 5)
-create a BOOT folder
put boot.sdi in there (from 3)
put bcd in there (from 2) / applies for Win8
-create a EFI/MICROSOFT/BOOT folder
put bcd in there (from 2) / applies for Win7
put the FONT folder in there (from 4)

You should end up with the following :
=>ROOT
-bootx64.efi
==>SOURCES
==boot.wim
==>BOOT
==boot.sdi
==bcd (for win8)
==>EFI/MICROSOFT/BOOT
==bcd (for win7)
===>FONTS
===*.ttf

3/Things you need to do on your boot.wim

Add the following winpeshl.ini (create it with notepad) file in your boot.wim (system32), making it a « cheap » winpe.

To modify your boot.wim, you can either mount/change/commit it with DISM (from the command line), or withCloneDisk or else modify it with wimlib :
wimlib-imagex update boot.wim 1 --command="add CustomWinpeshl.ini \Windows\System32\winpeshl.ini"


[LaunchApps]
%SYSTEMDRIVE%\Windows\system32\startnet.cmd
%SYSTEMDRIVE%\windows\system32\cmd.exe

4/Things you need to do in your PXE Server :

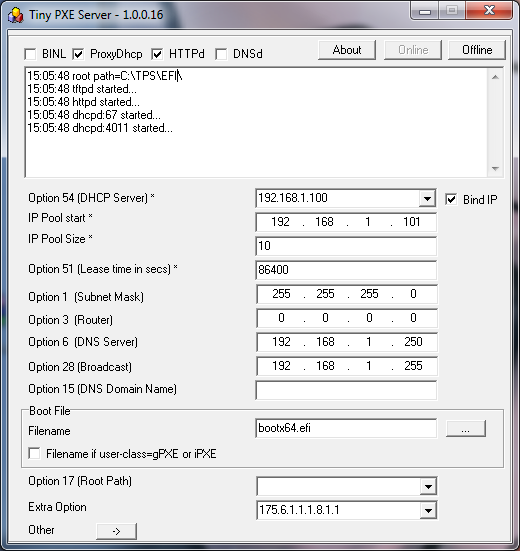
Set bootx64.efi as the bootp filename.

The UEFI + PXE boot process will be the following :
-pxe->bootx64.efi (from windows install dvd)->bcd (pointing to winload.efi)->boot.wim (x64 only)

as opposed to a legacy bios computer :
-pxe->pxeboot.n12 (from windows install dvd)-> bootmgr.exe -> bcd (pointing to winload.exe) -> boot.wim

Site note : you can use option dhcp 252 to decide which BCD file to load.
Can be handy when you want to switch from a UEFI computer to a legacy BIOS computer : efi\microsoft\boot or boot\bcd

tps_howto_uefi

side note : you can check if you booted on uefi with the following reg query HKLM\System\CurrentControlSet\Control /v PEFirmwareType Will output 0x1 for bios, 0x2 for uefi.

Cheers,
Erwan

Note that the following would aso work : PXE-> IPXE.efi ->MS Bootx64.efi ->BCD (winload.efi) ->Boot.wim (x64).

Ipxe script

#!ipxe
#change with you dhcp or proxydhcp server
set next-server 192.168.1.11
set filename boot/x64/bootmgfw.efi
chain tftp://${next-server}/${filename}

And changes to apply to your BCD : bcdedit.exe /store my.bcd /set {bootmgr} nointegritychecks yes

14/8/14

on Leave a Comment

How-To: Hotel Management System for Elastix

Two blog posts in 24 hours? We’re on a roll here!
Based off PIAF’s Hotel Management System, we’re going to make some minor adjustments to have this work with Elastix. This is a brilliant Hotel Room Management system with the ability to restrict the calls from Ext’s when they are not checked in, per-second billing, and more!

Contents:

  1. Installing the base system
  2. Updating the config
  3. Fixing up HTTPS
  4. Updating dial-plan
  5. Closing words

8/5/14

on Leave a Comment

Create an all-in-one x86+x64 Win7/Vista/Server 2008/R2 USB stick

One of the great things about the Vista and post-Vista operating systems is that the installer subsystem allows you a great deal of flexibility when it comes to installing multiple operating systems. It is fairly easy to put together a single installation DVD or USB stick that will allow you to install Vista, Windows 7, Server 2008 and Server 2008 R2 – in a variety of x86 and x64 flavors.

A couple of things to note about this guide:

  • I do not use Vista — I have never really used Vista and now with Windows 7 out there really is no reason to; however the steps here should work just fine with Vista installation sources
  • I have only tested this using a USB stick and will only cover that method here – it’s much more flexible (and faster) for installation than using DVD — but DVDs should work just fine: you can find plenty of tutorials on the web that will tell you how to useoscdimg.exe to take the files we create here and turn them into a burnable ISO

    WHAT YOU WILL NEED:

  • USB stick, at least 4 GB (perhaps larger depending on how many OSes you plan to integrate, I use a 16 GB) that has been properly formatted using Steps 1 and 2 here
  • ISOs or DVDs of the operating systems that you plan to integrate
  • imagex.exe (can be found for download on the web, or you can download the full 1.7 GB WAIK here)
  • computer running Vista or newer operating system (XP should work but I have not tested it)

STEP 1: Extract the operating system files

Take your various ISO files or DVDs and copy their contents into subfolders on your hard drive – in my case I have Windows 7 x86, Windows 7 x64, and Windows 2008 R2, so I created folders called e:\7×86, e:\7×64, and e:\2008r2    (E is the letter of my hard drive, not the USB drive).

STEP 2: Browse the WIM files and extract the desired editions

Open a WAIK command prompt, or browse to whatever folder you downloadedimagex.exe to within an administrative level command prompt.  Start by running the following command:

imagex.exe /info e:\7×86\sources\install.wim

This will display a big verbose mess that, once you parse through it, lists out all the editions embedded in the WIM file (and their associated index #).  Most default Microsoft WIMs will have multiple editions – in this case the ones in the Windows 7 x86 WIM boil down to:

  • 1 Starter
  • 2 Home Basic
  • 3 Home Premium
  • 4 Professional
  • 5 Ultimate

Since Starter edition is basically worthless, I only want editions 2-5 in my custom WIM file, so I run these commands one after another:

imagex.exe /export e:\7×86\sources\install.wim 2 e:\install.wim“Windows 7 HOMEBASIC (x86)” /compress maximum

imagex.exe /export e:\7×86\sources\install.wim 3 e:\install.wim“Windows 7 HOMEPREMIUM (x86)” /compress maximum

imagex.exe /export e:\7×86\sources\install.wim 4 e:\install.wim“Windows 7 PROFESSIONAL (x86)” /compress maximum

imagex.exe /export e:\7×86\sources\install.wim 5 e:\install.wim“Windows 7 ULTIMATE (x86)” /compress maximum

I now have an install.wim file in the root of my E drive that contains only the editions I specified in these commands.  Next,  I want to integrate Windows 7 x64 so I repeat the above steps using the 7×64 path instead of 7×86.  You will notice that the x64 version of Windows 7 has no Starter edition, so the index numbers are not the same as the x86 source!  Also, since just about any machine new enough to run x64 is likely new enough to handle Aero graphics, I don’t bother with integrating the Home Basic version of x64 into my WIM – so I only add Home Premium, Professional, and Ultimate.

I then repeat these steps again using the Windows 2008 R2 source (here again I discriminate – I only pull Standard, Enterprise, Standard Core, and Enterprise Core because I have no use for the DataCenter or Web versions).

You can of course integrate any OSes and editions you like!  When you are done, you will have an install.wim file of varying size (for those of you planning on burning to DVD, you may have issues with WIM files that are larger than 4 GB…  To get around this see this link)

STEP 3: Finalize the USB stick

You must now choose which OS you want to use as the boot environment – this needs to be an x86 operating system if you plan to install any x86 OSes (because x86 OSes cannot be installed from x64 boot environments).  You also want to use the newest operating system you can, because you may encounter issues if you try to deploy an OS that is older than the boot environment - in my case I use Windows 7 x86 to ensure I can deploy any operating system I like:

  • take the custom install.wim file (from E:\) and replace the install.wim file in e:\7×86\sources
  • copy all contents from e:\7×86 to your USB stick
  • ***EDIT*** please see JAG’s comment below for a link to the extra step required to get the server OS to work properly!

Now boot from the USB stick and you should see all your OSes, like below!

osinstall1 osinstall2

from: http://g0b3ars.wordpress.com/

Mrbaduong. Được tạo bởi Blogger.